In this tutorial we will examine something different – the ability of our Arduino and compatible boards to create composite video output. In other words, displaying stuff from the Arduino on a TV with analog video input.
A lot of people were unaware of the ability to do this, however the process is very simple and not difficult to implement from a hardware perspective. Within this chapter we will learn to construct the minimum hardware required and demonstrate basic functions to get started.
To whet your appetite, here is a quick video demonstration of what is possible:
You can’t expect too much from a 16 MHz microcontroller without a video card… but the price is right, and with some imagination and the right functions you can do quite well. To make this happen we need to knock out some hardware of our own.
Connection is very easy. First we need to locate three pins on our Arduino board. They will be used to output Sync, Video and also GND. For those with Arduino Uno, etc – Sync is digital 9, video is digital 7 and GND is … GND. If you have a Mega/Mega2560 Sync is digital 11 and video is A7. There is also the ability to generate audio with the methods in this article, and if you want to do this the Uno (etc.) pin is digital 11 or 10 on the Mega.
The monitor or television used needs to have a composite video-in socket (jack). For those with older televisions that have a VCR connected, you could use the video-in socket on the VCR. The schematic for video out is very simple, you only need two normal 0.25W resistors and a video lead:


If you’re not up for soldering into an RCA plug, a simple way is to chop up a standard video lead as such:


Then just wire the termination of the two resistors to the centre core (“pin”) and GND to the shield. For the purpose of this article we have made a quick TV-out shield that also includes a thumb joystick.

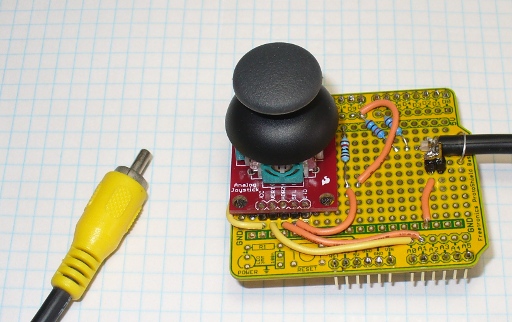
A real triumph of engineering… however it solves the problem. The vertical trimmer is connected to A0; the horizontal to A1; the button to digital 8 via a 10k0 pull-up resistor. Next, you will need to download and install the arduino-tvout library. It can be found here. We will use the TVoutBeta1.zip version. Those of you who may have a nootropic design Hackvision – please note your library is different.
Now to see how to integrate TV-out into our sketch. We will run through the basic functions which integrated with your imagination should see some interesting results… So let’s go!
For every project, place these two lines at the top of your sketch:
#include "TVout.h"
TVout TV;
The first brings in the library, and the second line creates an instance of TV to use with the library functions. Next, we need to activate TVout and select the appropriate broadcast standard (PAL or NTSC). In void setup() use either
TV.start_render(_NTSC) // for NTSC (or)
TV.start_render(_PAL); // for PAL system
Now for the main functions. The first one of interest will be:
TV.clear_screen();
which … clears the screen. Or if you would like to fill the screen with white, use
TV.fill_screen(1);
Moving on – to write some text. First we need to select a font. There are three basic fonts to choose from:
- font4x6 (each character being 4 pixels by 6 pixels, etc.)
- font6x8
- font8x8
Well there is four, but it wouldn’t display for me. Working on it! To choose a font use:
TV.select_font(font4x6); // using font4x6
Then to write the text, choose the screen location with:
TV.set_cursor(x,y);
then display the text with:
TV.print("Hello, world..."); // etc
You can also use TV.println(); to add a carriage return as expected. Display single characters with a position in the one function using:
TV.print_char(x,y,c); // c is the character to display
So let’s have a look at the various fonts in action with the following sketch:
Now to move into the 1970s with some basic graphical functions. We have a screen resolution of 128 by 96 pixels to work with. When planning your display, you need to ensure that the sketch never attempts to display a pixel outside of the 128 x 96 screen area. Doing so generally causes the Arduino to reboot.
TV.set_pixel(x,y,z);
where x and y are the coordinates of the pixel, and z is the colour (1 = white, 0 = black, 2 = inverse of current pixel’s colour). You want more than a pixel? How about a line:
TV.draw_line(x1,y1,x2,y2,colour);
Draws a line from x1, y1 to x2, y2 of colour colour. (1 = white, 0 = black, 2 = inverse of current pixel’s colour).
Rectangles? Easy:
TV.draw_rect(x,y,w,h,colour,fill);
Draws a rectangle with the top-left corner at x,y; width w, height h, colour and optional fill colour. Circles are just as simple:
TV.draw_circle(x,y,r,colour,fill);
Draws a circle with centre at x,y; radius r pixels, edge colour, optional fill colour.
Now to see these functions in action with the following sketch:
/*
  arduino-tvout text demonstration
 */

#include <TVout.h>
#include <fontALL.h>
TVout TV;

int d=10; // for delay purposes
char c='X';

void setup()
{
  TV.begin(_PAL); // for PAL system
  TV.clear_screen();
}

void loop()
{
  TV.select_font(font4x6);
  for (int a=0; a<6; a++)
  {
    for (int b=0; b<128; b++)
    {
      TV.print_char(b,a*6,c);
      delay(d);
      TV.clear_screen();
    }
  }
  delay(1000);
  TV.clear_screen();

  TV.select_font(font6x8);
  for (int a=0; a<6; a++)
  {
    for (int b=0; b<128; b++)
    {
      TV.print_char(b,a*8,c);
      delay(d);
      TV.clear_screen();
    }
  }
  delay(1000);
  TV.clear_screen();

  TV.select_font(font8x8);
  for (int a=0; a<6; a++)
  {
    for (int b=0; b<128; b++)
    {
      TV.print_char(b,a*8,c);
      delay(d);
      TV.clear_screen();
    }
  }
  delay(1000);
  TV.clear_screen();
}
And for the video demonstration:
So there you have it, a start with Arduino and TV-out. Furthermore, a big thanks to http://code.google.com/u/mdmetzle/ for the arduino-tvout library.
This post brought to you by pmdway.com everything for makers and electronics enthusiasts, with free delivery worldwide.
To keep up to date with new posts at tronixstuff.com, please subscribe to the mailing list in the box on the right, or follow us on twitter @tronixstuff.
