This is the first of two chapters in which we are going to start investigating the SPI data bus, and how we can control devices using it with our Arduino systems.
The SPI bus may seem to be a complex interface to master, however with some brief study of this explanation and practical examples you will soon become a bus master! To do this we will learn the necessary theory, and then apply it by controlling a variety of devices. In this tutorial things will be kept as simple as possible.
But first of all, what is it? And some theory…
SPI is an acronym for “Serial Peripheral Interface”. It is a synchronous serial data bus – data can travel in both directions at the same time, as opposed to (for example) the I2C bus that cannot do so. To allow synchronous data transmission, the SPI bus uses four wires. They are called:
- MOSI – Master-out, Slave-in. This line carries data from our Arduino to the SPI-controlled device(s);
- MISO – Master-in, Slave out. This line carries data from the SPI-controlled device(s) back to the Arduino;
- SS – Slave-select. This line tells the device on the bus we wish to communicate with it. Each SPI device needs a unique SS line back to the Arduino;
- SCK – Serial clock.
Within these tutorials we consider the Arduino board to be the master and the SPI devices to be slaves. On our Arduino Uno and compatible boards the pins used are:
- SS – digital 10. You can use other digital pins, but 10 is generally the default as it is next to the other SPI pins;
- MOSI – digital 11;
- MISO – digital 12;
- SCK – digital 13;
Arduino Mega users – MISO is 50, MOSI is 51, SCK is 52 and SS is usually 53. If you are using an Arduino Leonardo, the SPI pins are on the ICSP header pins. See here for more information. You can control one or more devices with the SPI bus. For example, for one device the wiring would be:

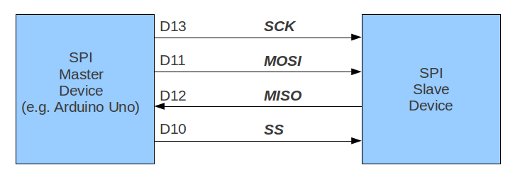
Data travels back and forth along the MOSI and MISO lines between our Arduino and the SPI device. This can only happen when the SS line is set to LOW. In other words, to communicate with a particular SPI device on the bus, we set the SS line to that device to LOW, then communicate with it, then set the line back to HIGH. If we have two or more SPI devices on the bus, the wiring would resemble the following:

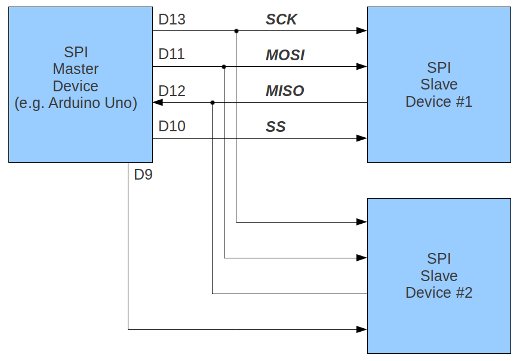
Notice how there are two SS lines – we need one for each SPI device on the bus. You can use any free digital output pin on your Arduino as an SS line. Just remember to have all SS lines high except for the line connected to the SPI device you wish to use at the time.
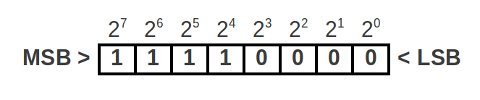
Data is sent to the SPI device in byte form. You should know by now that eight bits make one byte, therefore representing a binary number with a value of between zero and 255.
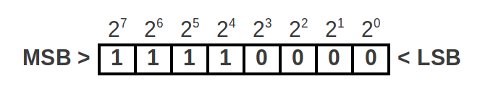
When communicating with our SPI devices, we need to know which way the device deals with the data – MSB or LSB first. MSB (most significant bit) is the left-hand side of the binary number, and LSB (least significant bit) is the right-hand side of the number. That is:
Apart from sending numerical values along the SPI bus, binary numbers can also represent commands. You can represent eight on/off settings using one byte of data, so a device’s parameters can be set by sending a byte of data. These parameters will vary with each device and should be illustrated in the particular device’s data sheet. For example, a digital potentiometer IC with six pots:

This device requires two bytes of data. The ADDR byte tells the device which of six potentiometers to control (numbered 0 to 5), and the DATA byte is the value for the potentiometer (0~255). We can use integers to represent these two values. For example, to set potentiometer number two to 125, we would send 2 then 125 to the device.
How do we send data to SPI devices in our sketches?
First of all, we need to use the SPI library. It is included with the default Arduino IDE installation, so put the following at the start of your sketch:
#include "SPI.h"
Next, in void.setup() declare which pin(s) will be used for SS and set them as OUTPUT. For example,
pinMode(ss, OUTPUT);
where ss has previously been declared as an integer of value ten. Now, to activate the SPI bus:
SPI.begin();
and finally we need to tell the sketch which way to send data, MSB or LSB first by using
SPI.setBitOrder(MSBFIRST);
or
SPI.setBitOrder(LSBFIRST);
When it is time to send data down the SPI bus to our device, three things need to happen. First, set the digital pin with SS to low:
digitalWrite(SS, LOW);
Then send the data in bytes, one byte at a time using:
SPI.transfer(value);
Value can be an integer/byte between zero and 255. Finally, when finished sending data to your device, end the transmission by setting SS high:
digitalWrite(ss, HIGH);
Sending data is quite simple. Generally the most difficult part for people is interpreting the device data sheet to understand how commands and data need to be structured for transmission. But with some practice, these small hurdles can be overcome.
Now for some practical examples!
Time to get on the SPI bus and control some devices. By following the examples below, you should gain a practical understanding of how the SPI bus and devices can be used with our Arduino boards.
MCP4162 Example
Our first example will use a simple yet interesting part – a digital potentiometer (we also used one in the I2C tutorial). This time we have a Microchip MCP4162-series 10k rheostat:
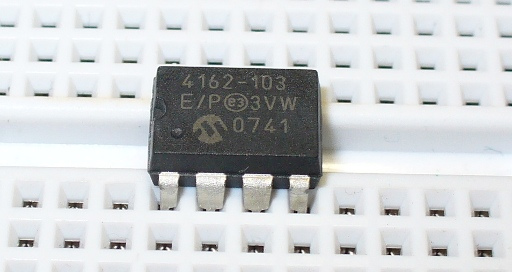
Here is the data sheet for your perusal. To control it we need to send two bytes of data – the first byte is the control byte, and thankfully for this example it is always zero (as the address for the wiper value is 00h [see table 4-1 of the data sheet]). The second byte is the the value to set the wiper, which controls the resistance. So to set the wiper we need to do three things in our sketch…
First, set the SS (slave select) line to low:
digitalWrite(10, LOW);
Then send the two byes of data:
SPI.transfer(0); // command byte
SPI.transfer(value); // wiper value
Finally set the SS line back to high:
digitalWrite(10, HIGH);
Easily done. Connection to our Arduino board is very simple – consider the MCP4162 pinout:
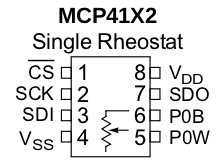

Vdd connects to 5V, Vss to GND, CS to digital 10, SCK to digital 13, SDI to digital 11 and SDO to digital 12. Now let’s run through the available values of the MCP4162 in the following sketch:
/*
 SPI bus demo using a Microchip MCP4162 digital potentiometer [http://bit.ly/iwDmnd]
 */

#include "SPI.h" // necessary library
int ss=10; // using digital pin 10 for SPI slave select
int del=200; // used for various delays

void setup()
{
  pinMode(ss, OUTPUT); // we use this for SS pin
  SPI.begin(); // wake up the SPI bus.
  SPI.setBitOrder(MSBFIRST);
  // our MCP4162 requires data to be sent MSB (most significant byte) first
}

void setValue(int value)
{
  digitalWrite(ss, LOW);
  SPI.transfer(0); // send command byte
  SPI.transfer(value); // send value (0~255)
  digitalWrite(ss, HIGH);
}

void loop()
{
  for (int a=0; a<256; a++)
  {
    setValue(a);
    delay(del);
  }
  for (int a=255; a>=0; --a)
  {
    setValue(a);
    delay(del);
  }
}
Now to see the results of the sketch. In the following video clip, a we run up through the resistance range and measure the rheostat value with a multimeter:
Before moving forward, if digital potentiometers are new for you, consider reading this short guide written by Microchip about the differences between mechanical and digital potentiometers.
Another example:
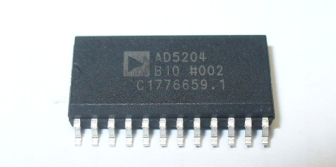
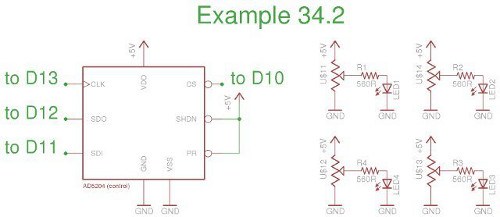
In this example, we will use the Analog Devices AD5204 four-channel digital potentiometer (data sheet.pdf). It contains four 10k ohm linear potentiometers, and each potentiometer is adjustable to one of 256 positions.
The settings are volatile, which means they are not remembered when the power is turned off. Therefore when power is applied the potentiometers are all pre set to the middle of the scale. Our example is the SOIC-24 surface mount example, however it is also manufactured in DIP format as well.
To make life easier it can be soldered onto a SOIC breakout board which converts it to a through-hole package:
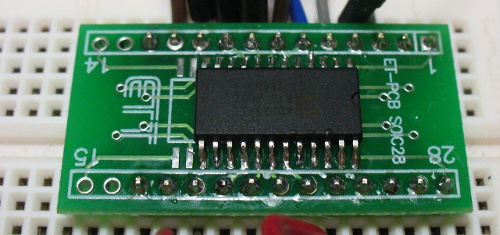
In this example, we will control the brightness of four LEDs. Wiring is very simple. Pinouts are in the data sheet.
And the sketch:
#include <SPI.h> // necessary library
int ss=10; // using digital pin 10 for SPI slave select
int del=5; // used for fading delay
void setup()
{
 pinMode(ss, OUTPUT); // we use this for SS pin
 SPI.begin(); // wake up the SPI bus.
 SPI.setBitOrder(MSBFIRST);
 // our AD5204 requires data to be sent MSB (most significant byte) first. See data sheet page 5
 allOff(); // we do this as pot memories are volatile
}
void allOff()
// sets all potentiometers to minimum value
{
 for (int z=0; z<4; z++)
 {
 setPot(z,0);
 }
}
void allOn()
// sets all potentiometers to maximum value
{
 for (int z=0; z<4; z++)
 {
 setPot(z,255);
 }
}
void setPot(int pot, int level)
// sets potentiometer 'pot' to level 'level'
{
 digitalWrite(ss, LOW);
 SPI.transfer(pot);
 SPI.transfer(level);
 digitalWrite(ss, HIGH);
}
void blinkAll(int count)
{
 for (int z=0; z
void indFade()
{
 for (int a=0; a<4; a++)
 {
 for (int l=0; l<255; l++)
 {
 setPot(a,l);
 delay(del);
 }
 for (int l=255; l>=0; --l)
 {
 setPot(a,l);
 delay(del);
 }
 }
}
void allFade(int count)
{
 for (int a=0; a<count; a++)="" {="" for="" (int="" l="0;" l<255;="" l++)="" setpot(0,l);="" setpot(1,l);="" setpot(2,l);="" setpot(3,l);="" delay(del);="" }="">=0; --l)
 {
 setPot(0,l);
 setPot(1,l);
 setPot(2,l);
 setPot(3,l);
 delay(del);
 }
 }
}
void loop()
{
 blinkAll(3);
 delay(1000);
 indFade();
 allFade(3);
}
The function allOff() and allOn() are used to set the potentiometers to minimum and maximum respectively. We use allOff() at the start of the sketch to turn the LEDs off. This is necessary as on power-up the wipers are generally set half-way.
Furthermore we use them in the blinkAll() function to … blink the LEDs. The function setPot() accepts a wiper number (0~3) and value to set that wiper (0~255). Finally the function indFade() does a nice job of fading each LED on and off in order – causing an effect very similar to pulse-width modulation.
Finally, here it is in action:
So there you have it – hopefully an easy to understand introduction to the world of the SPI bus and how to control the devices within. As always, now it is up to you and your imagination to find something to control or get up to other shenanigans. In the next SPI article we will look at reading and writing data via the SPI bus.
This post brought to you by pmdway.com – everything for makers and electronics enthusiasts, with free delivery worldwide.
To keep up to date with new posts at tronixstuff.com, please subscribe to the mailing list in the box on the right, or follow us on twitter @tronixstuff.
